What Is Local Business Schema?
Local business schema is a type of code you add to your website to give search engines business details like your name, address, phone number, and operating hours.
While schema (also called structured data and schema markup) doesn’t create your Google Business Profile or directly control how your business appears on Maps, it reinforces that information.

Local business schema differs from organization schema in that it's specifically meant for businesses with physical locations that want to optimize for local search.
Why Should You Use Local Business Schema?
Local business schema makes it easier for search engines to understand and highlight your business.
Specifically, local business schema is useful for:
Improving Local Search Visibility
Local business schema helps search engines understand your business so they can better match you to relevant queries.
For example, local business schema could help a business show for “bakery new orleans,” even if those words don’t explicitly appear anywhere in the actual listing.

Securing Rich Results
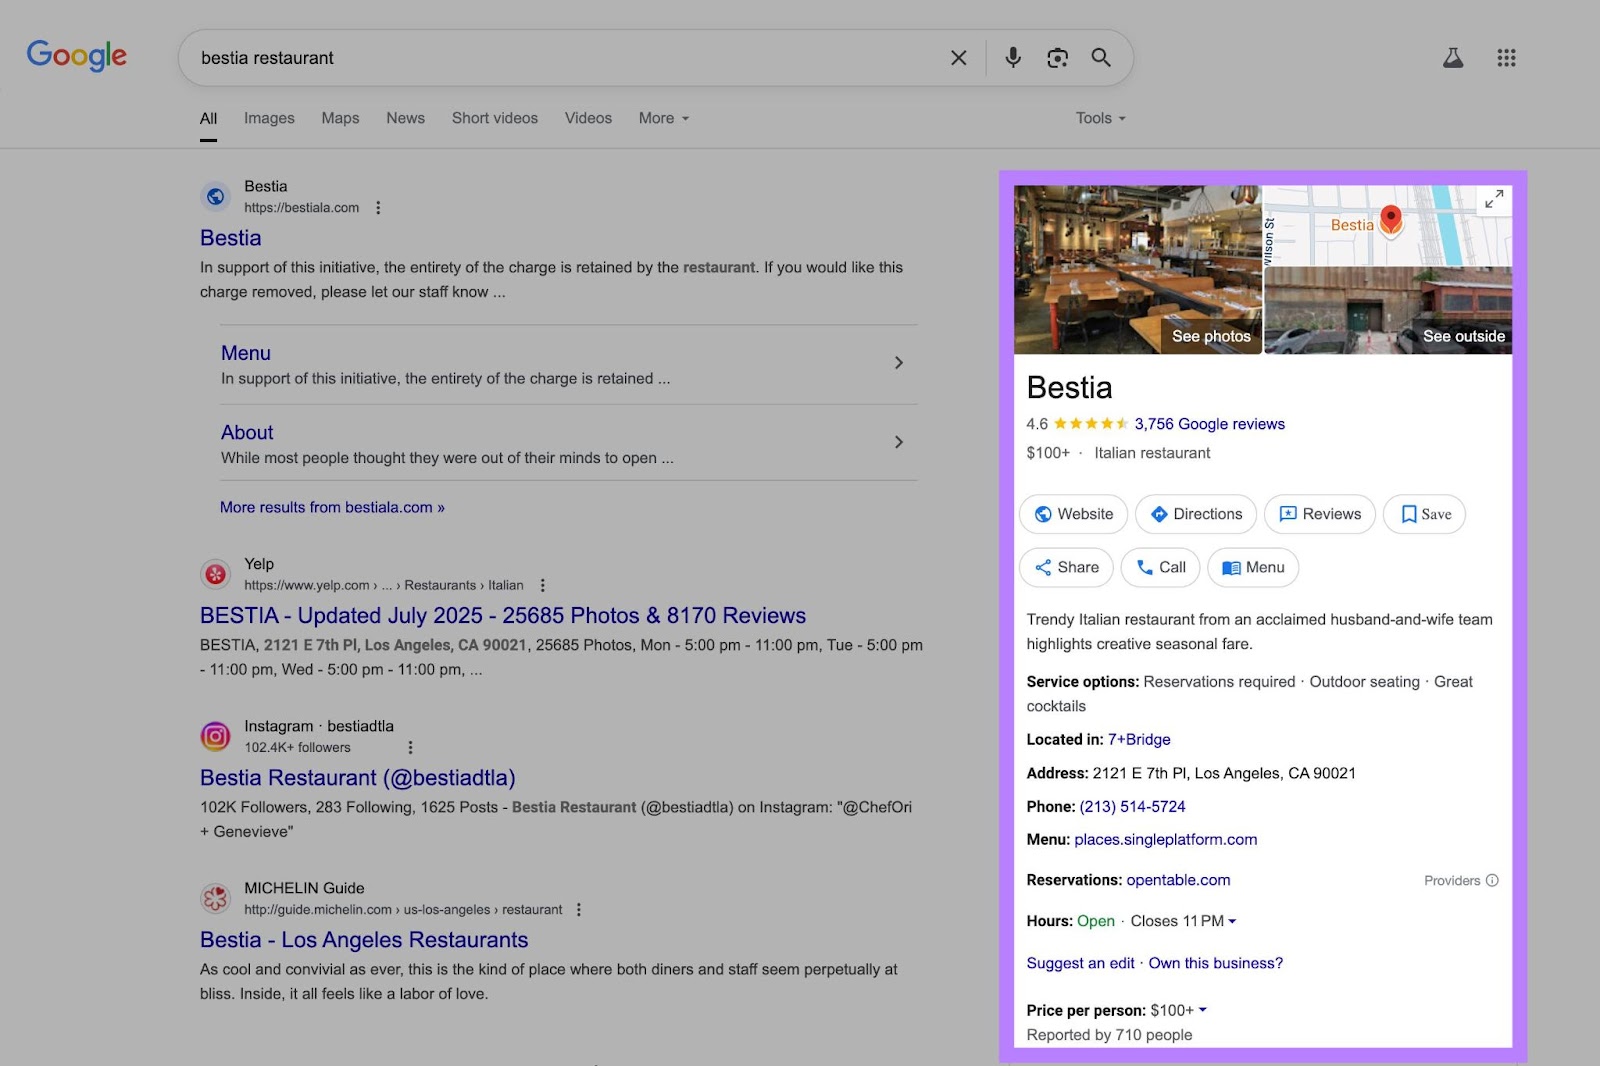
Using local business schema makes your site eligible for enhanced search result features called rich results.
These rich results can display details like:
- Star ratings from customer reviews
- Opening hours
- Business photos
- Price range
These extra details can make your organic search result more informative and visually appealing, which can improve click-through rates.
While schema doesn’t guarantee these features will appear, using structured data makes you eligible for them.
Increasing Visibility in AI Tools
Structured data can help AI-powered platforms—like ChatGPT and Google’s AI Mode—better interpret and summarize your website content.
In one experiment by Aiso, pages that used schema markup were more likely to appear in AI-generated summaries. This suggests structured data helps these systems extract key business information more effectively.
Common Local Business Schema Properties
Before you add schema to your site, it’s helpful to understand which properties to include and what each conveys.
These are the most common properties in local business markup:
| Property | What It Does |
| name | Communicates your official business name |
| address | Provides your full physical address |
| telephone | Lists your main business phone number for contact |
| openingHours | Shows your general hours of operation (e.g., Mo-Fr 09:00-18:00) |
| openingHoursSpecification | Adds more detailed information about hours, such as if hours vary for different days of the week |
| url | Provides the link to your official business website |
| image | Specifies a photo of your storefront, logo, or another key image. Whether it’s displayed depends on how and where it's used. |
| geo | Supplies latitude and longitude to pinpoint your location |
| sameAs | Provides URLs to official or authoritative profiles (like your LinkedIn, Wikipedia, or social media pages) that confirm your business’s identity |
| review | Lets you manually include full details of an individual customer review. Like the author, date, rating, and review text. |
| aggregateRating | Indicates the average star rating and total number of reviews |
| priceRange | Indicates your typical pricing level (e.g., $$) |
| paymentAccepted | Lists payment types you accept |
| currenciesAccepted | Specifies which currencies you take (e.g., EUR) |
| hasMap | Links to your business location on a map |
How to Generate Local Schema
In this section, I’ll show how to generate local business schema using two methods:
- Google’s Structured Data Markup Helper
- ChatGPT
I’ll use the same real-world example for both: Little Collins, a cafe in Midtown Manhattan.
Using Google’s Structured Data Markup Helper to Generate Local Schema
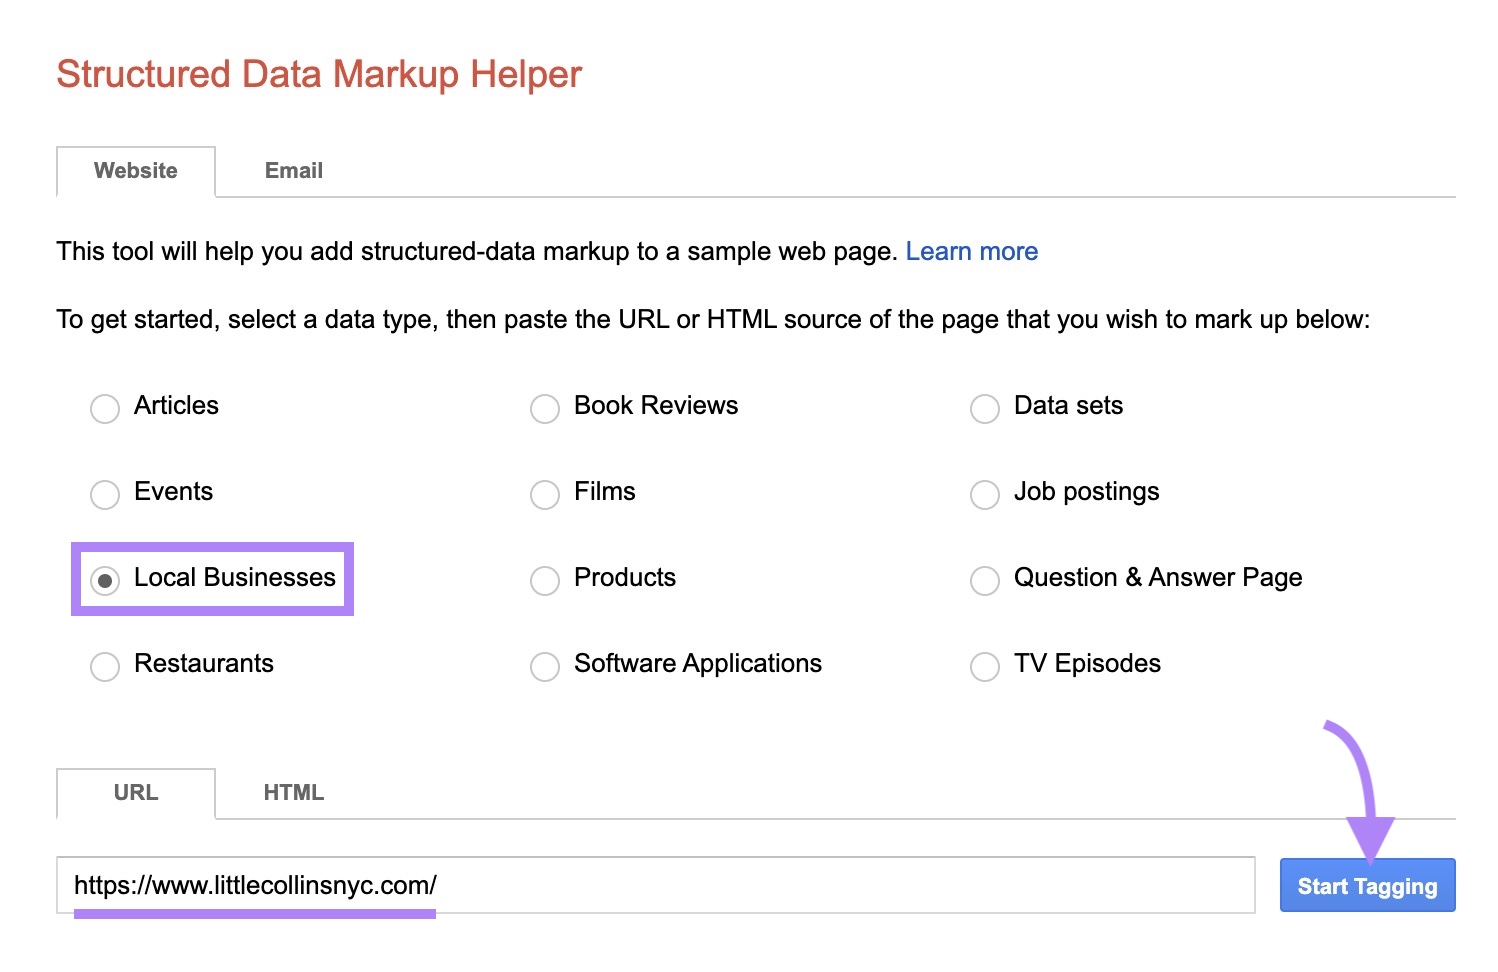
Go to Google’s Structured Data Markup Helper and choose the circle next to “Local Businesses” from the category list.
Enter the URL of the page that contains your key business information (e.g., your homepage, about page, or contact page), then click “Start Tagging.”

You’ll see your site on the left and a “Records” panel on the right.

To tag information:
- Highlight a piece of text (like your address or business name)
- Choose the appropriate tag from the drop-down menu that appears
In the example below, I tagged “708 3rd Ave” as the “Street address.”
Theright-hand “Records” panel updates automatically with each tag.

Once you’ve finished tagging, click “Create HTML.”

The tool will then generate JSON-LD code that you can copy and paste.

The tool can only tag what’s visible on a single webpage. And many businesses have info (like social links, hours, or reviews) spread across multiple pages or formatted in a way that’s tricky to tag.
That’s why I usually prefer generating schema with a tool like ChatGPT.
Using ChatGPT to Generate Local Schema
Start by writing out your key business details, including your website, contact info, hours, and even a sample customer review.
Here’s an example prompt I entered using the same cafe:
“Create local business schema in JSON-LD format for Little Collins, a café located at 708 3rd Ave, New York, NY 10017. The phone number is (212) 308-1969. The email is info@littlecollinsnyc.com. The website is www.littlecollinsnyc.com. Opening hours are: Monday 7am–6pm, Tuesday–Friday 7am–8pm, and weekends 7:30am–6pm. Also include a customer review: “Best coffee in Midtown! Friendly staff and great vibe.” – Sarah M.”
ChatGPT then returns your schema in JSON-LD format, so it’s ready to copy:

One thing I like about using ChatGPT is that it often includes helpful suggestions.
Like this recommendation to add an "image" field with a proper logo or storefront photo. And the suggestion to wrap reviews in a "reviewRating" block to follow best practices from Schema.org.

I also like how, once you’ve generated your schema, it’s easy to tweak or expand.
With Google’s Structured Data Tool, making changes usually means starting over and re-tagging the entire page.
With ChatGPT, you can just enter a follow-up like:
“Now add my social profile URLs: https://www.instagram.com/littlecollinsnyc/ and https://www.facebook.com/littlecollinsnyc/.”
ChatGPT will instantly return an updated version of the schema with those fields included. No rework required.

How to Add Local Business Schema to Your Website
There are two main ways to add local business schema to your site:
Use a Plugin to Add Schema in WordPress
If you’re using WordPress and prefer a code-free setup, SEO plugins make it easy to implement local business schema.
Popular options include:
For example, Yoast Local SEO lets you add key business details without ever touching your site’s code.

Just be aware that you need Yoast SEO Premium and the Yoast Local SEO add-on to access local SEO features in Yoast.
Plugins are convenient. But they may limit how much you can customize.
Add Local Business Schema Manually
Adding the schema manually is often the better choice if you want full control.
Back up your website before editing. If you’re not comfortable working with code, it’s safest to ask a developer for help.
Then:
- Generate your schema using either Google’s Structured Data Markup Helper or ChatGPT
- Copy the code
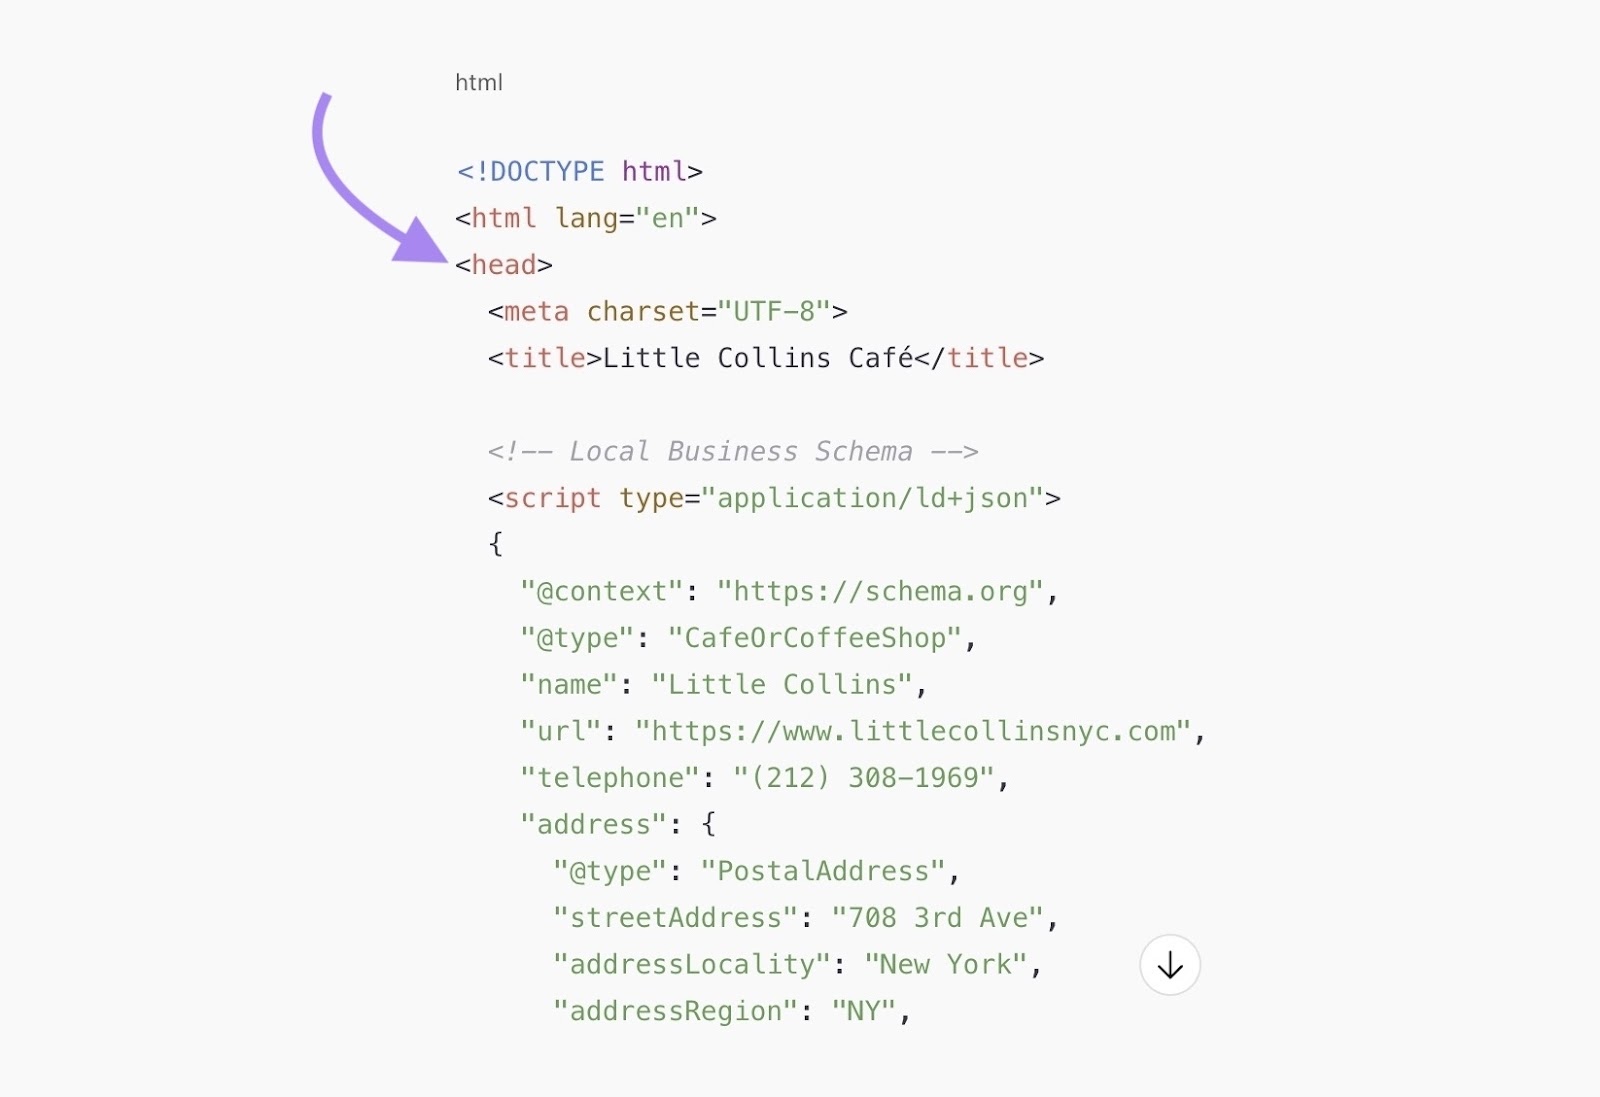
- Paste it into the <head> section of the page where your business info lives—typically your homepage, about page, or contact page
Here’s what that looks like:

How to Add Local Business Schema for Multiple Locations
If your business has multiple physical locations, the best practice is to create a dedicated page for each one. And add separate local business schema to each of those pages.
Each location page should include:
- The branch’s specific address
- Phone number
- Opening hours
- Geographic coordinates (if available)
- Any other location-specific info (like reviews or social links)
Once your location pages are live, generate unique schema for each one using Google’s Structured Data Markup Helper or ChatGPT.
How to Validate Your Local Business Schema
Check that the local business schema added to your site is valid to make sure search engines can understand it.
Use Schema.org’s Validator
Use Schema.org’s official validator to check your markup by entering the live page URL.
Go to the Schema Markup Validator.
Select the “Fetch URL” tab, enter your page’s URL, and click “Run test.”

Ideally, you’re looking for a “0 Errors” and “0 Warnings” result:

If there are any issues, the tool will highlight them. So you can identify and fix problems quickly.
Use Site Audit
Semrush’s Site Audit tool is another good way to validate your structured data. Plus, it reveals tons of other information about your website’s technical health.
Start by configuring a new site audit.
Once the audit is complete, go to the “Overview” tab. Scroll to the “Markup” section and click “View details.”

Here you’ll see:
- How many pages have markup
- The types of markup found (JSON-LD, Microdata, etc.)
- Pages with invalid or missing structured data

Scroll to the “Structured Data Items” table and look for “Local Business” in the “Item” column.
If there are any invalid lines related to your local business schema, they’ll appear here. And you can click the number that appears in the “Invalid” column to see the affected pages and which fields need to be fixed.
In this case, there aren’t any issues.

Fix any errors on your site if needed, then run the audit again to confirm they’ve been resolved.
Improve Your Local Business’s Online Visibility
Adding local business schema is a solid step you can take toward increasing your visibility in local search and AI-driven platforms.
But schema is just one piece of the puzzle:
The Semrush Local Toolkit includes everything you need to grow your digital footprint, attract more local customers, and track performance.


